Starting an animation tutorial can feel like trying to climb a mountain. You see the amazing work out there and wonder how you’ll ever get from a blank screen to fluid, believable motion. But here's the secret: it all comes down to a few core ideas.
This guide isn't about throwing dense theory at you. It’s a practical roadmap. We’ll skip the fluff and get right into what makes animation work, focusing on fundamentals like frames and timing so you can get your first project moving today using powerful, free tools.
Getting Started Without the Overwhelm
Jumping into animation is exciting, but let’s be honest—the sheer number of tools and techniques can feel paralyzing. My goal is to slice right through that noise. I want to give you a clear, confidence-boosting path for your very first project, focusing on the practical why behind the principles that make animation look great.
Forget the idea that you need expensive software or years of art school. We're going to get you creating with tools that don't cost a dime. This removes the financial roadblock and lets you dive straight into the fun part. You’re not alone in wanting to learn this way, either.
The demand for accessible animation skills is exploding. On YouTube, a single free beginner course has pulled in over 67,000 views. Across various learning platforms, related subjects have enrolled a combined total of more than 128,000 learners. You're joining a massive, enthusiastic community.
The image below from Class Central really drives this point home, showing just how many people are searching for free, high-quality animation courses online.
This isn't just a niche hobby; thousands of people are actively seeking the exact skills this guide covers. It proves that starting with practical, accessible tutorials is a path well-traveled. If you're curious, you can explore the data on animation course popularity and see how you fit into this growing trend.
The Core Animation Concepts You'll Actually Use
Before we even think about opening any software, let’s quickly touch on the handful of concepts that truly matter. Getting a feel for these ideas first makes the hands-on work so much more intuitive. It’s the difference between blindly following steps and actually understanding what you’re creating.
Here’s a quick look at the core ideas we’ll put into practice. Understanding these makes the hands-on work much more intuitive.
| Principle | What It Means for You | Why It Matters Immediately |
|---|---|---|
| Frames | Think of them as individual pictures in a flipbook. The more frames per second (FPS), the smoother your animation will look. | Choosing your FPS is one of the first decisions you'll make. 12 FPS is great for a classic, stylized feel; 24 FPS is standard for smooth motion. |
| Timing | This is all about how long an action takes. Good timing gives objects a sense of weight, mood, and personality. | A fast, snappy movement feels energetic. A slow, gentle drift feels calm. Timing is your primary tool for storytelling. |
| Keyframes | These are the most important frames—the start and end points of any action. The software helps fill in the gaps. | Instead of drawing 24 frames for a one-second action, you might only need to create 2 or 3 keyframes. This is the ultimate time-saver. |
By building on just these three pillars, you'll be able to create compelling motion without getting bogged down in technical jargon. Seriously, every piece of animation you’ll ever make, from a simple bouncing ball to a complex character scene, starts right here.
Choosing and Setting Up Your Animation Software
The animation software you pick can either be your biggest ally or your worst enemy. It’s easy to get lost in professional suites that cost a fortune and have a learning curve a mile high. For this guide, we're going to sidestep all that complexity. You don't need a thousand confusing menus to make something move; you just need the core essentials.
I'm a huge advocate for starting with powerful, free tools. Two of the best out there are Krita and Blender. Krita is a phenomenal digital painting program that happens to have fantastic, straightforward frame-by-frame animation features built-in. Blender, on the other hand, is a full 3D powerhouse, but its 2D animation workspace (using an object called Grease Pencil) is a hidden gem—it's incredibly capable and feels surprisingly natural once you find your footing.
Your very first task, before you draw a single line, is to declutter your workspace. When you launch these programs for the first time, you’ll be greeted by an intimidating wall of panels, buttons, and settings. We're going to ignore 95% of them. The entire goal is to carve out a clean, simple space that shows only what you absolutely need, which helps you stay focused.
Your Essential Animation Toolkit
No matter which program you choose, your entire workflow will orbit around three key components. Think of this as your mission control for creating movement. Getting a good feel for these is your first real hands-on step.
- The Timeline: This is where the magic really happens. It’s a long, horizontal panel that lays out all your frames in sequence. This is how you control the timing and pacing of your animation, placing your key drawings to define the start and end of any action.
- Layers: If you’ve ever used Photoshop or any digital art program, you already know how valuable layers are. They let you stack and separate different parts of your scene. You might have one layer for your character, another for the background, and maybe even one for special effects. This kind of organization is a lifesaver for anything more complex than a bouncing ball.
- Drawing Tools: At the end of the day, you just need three things: a brush to draw, an eraser to fix your happy accidents, and a selection tool to move things around. Seriously, that's it. Resist the urge to fiddle with every brush texture and setting. A simple, solid pen will be your most reliable friend.
A piece of advice I always give beginners: create and save your own custom workspace. Once you figure out where you like your timeline, layers, and tools, arrange them just so and save that layout. This small act of personalization instantly makes the software feel like it’s your tool, not some scary, foreign program you're borrowing.
Setting Up a Simple and Clean Workspace
Let’s get practical. If you're using Blender, open the "2D Animation" workspace. You can right-click the borders between panels and select "Join Areas" to collapse things you don't need yet, like the Outliner or the Properties editor. In Krita, head to the "Window" > "Workspace" menu and pick a simple layout, then manually close any extra "Dockers" (Krita's term for panels) that are cluttering up your view.
The whole point is to build your screen around the canvas. Your drawing area should be front and center, with your timeline docked comfortably below it and your layers and tools off to one side. By starting with a clean slate, you give yourself the mental room to focus purely on the art of animation.
For a deeper dive into other creative tools and their specific interfaces, feel free to explore our full list of vibe coding and animation tools.
Bringing Your First Animation to Life
Alright, enough with the theory. It's time to actually make something move. The best way to get a feel for animation is by diving right in, and there's no better starting point than the classic bouncing ball. Seriously, it's a rite of passage for every animator for a reason.
This simple exercise is a powerhouse for learning the core principles of timing, spacing, and weight. We're going to focus on controlling the ball's speed and impact to make it feel genuinely heavy and reactive, not like a weightless balloon floating down.
You'll get to see firsthand how applying basic physics—like gravity and acceleration—and making tiny adjustments on your timeline can create dramatically different results.
Mastering Weight and Impact
The real secret to a believable bounce? It all comes down to timing and spacing. Timing is simply how long an action takes. Spacing, on the other hand, is the distance your object moves from one frame to the next.
Think about a ball falling. Gravity is pulling it down, so it accelerates. This means the spacing between each frame should get wider and wider as it approaches the ground. As it bounces back up, it's fighting gravity, so the spacing should get smaller and smaller until it hangs in the air for just a moment at the peak of its arc.
This is way easier to understand visually. Take a look at this screenshot from a fantastic beginner tutorial.
See how the keyframes are bunched up at the top of the bounce and spread out at the bottom? That visual spacing is exactly what sells the illusion of speed and weight.
Your Bouncing Ball Action Plan
Let’s break this down into a few practical steps. Don't chase perfection on your first attempt; the goal here is to wrap your head around the mechanics.
-
Set Your Key Poses: First, draw your two most important positions: the ball at its highest point (the start) and the ball hitting the ground (the impact). These are your anchor points, your keyframes.
-
Add the Squash and Stretch: Next, draw the frame just before impact and the one right after. This is where you can add some "squash" as the ball flattens against the ground and "stretch" as it deforms while launching back up. A little exaggeration goes a long way in making motion feel dynamic.
-
Fill in the Gaps (In-Betweens): Now you can draw the frames that connect your key poses. Just remember the spacing principle: closer together at the top of the arc, farther apart at the bottom.
A common rookie mistake is to make every bounce identical. A real ball loses energy, so each bounce should be a little lower than the one before it. Adding this detail gives your animation a huge boost in realism.
Getting comfortable with these fundamentals is non-negotiable for any aspiring animator. Once you nail this exercise, you'll have a real, hands-on understanding of what makes movement believable.
To see how these same principles are used in more advanced work, you should check out some of the completed vibe coding animation examples. It's a great way to get inspired and figure out what you want to create next.
Bringing It All Together: Your First Animated Scene
Alright, this is where the magic happens. We're going to take all the concepts we've covered and channel them into creating a complete, animated scene. This is that rewarding moment when you see your idea come to life, proving you can go from a blank canvas to a finished piece of animation.
For our first project, let's keep it simple but satisfying. Think about making a character wave hello or having a logo smoothly slide onto the screen. It's all about applying what you've learned in a real-world workflow.
We'll move from sketching a basic concept to animating it against a simple background. You'll set the main keyframes for the action, and then we'll let the software do the heavy lifting of filling in the gaps. This workflow breaks down into three core stages, which is the secret to keeping things manageable.
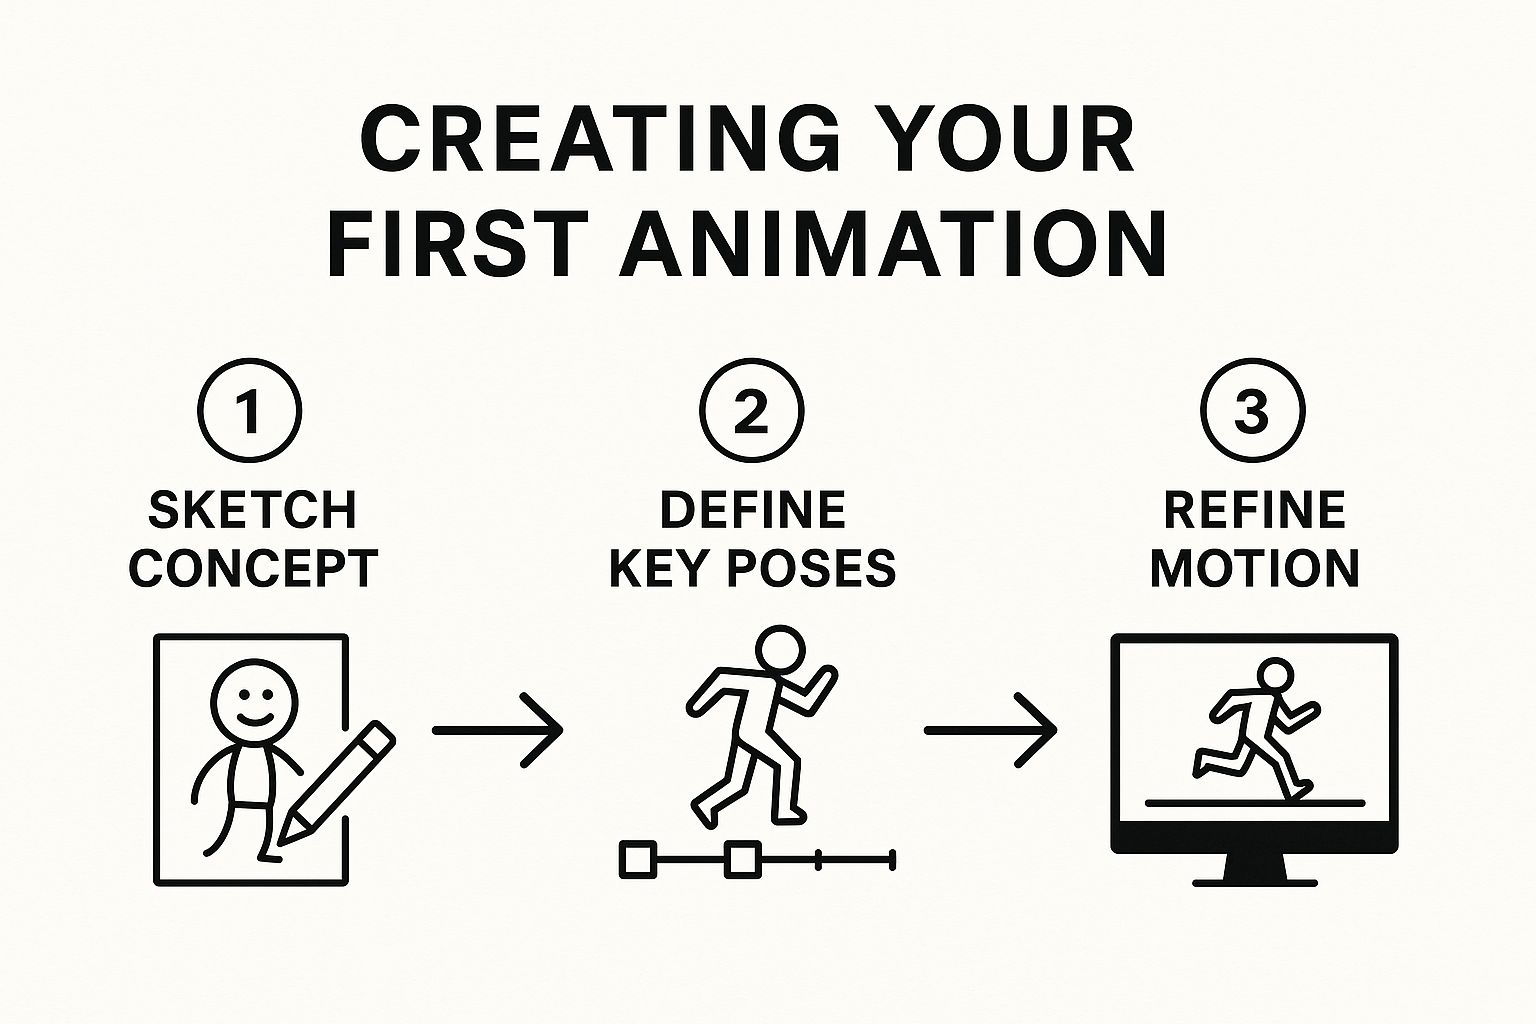
By tackling one part of the process at a time—concept, key poses, and refinement—you can focus your creative energy without feeling overwhelmed.
From Sketch to Key Poses
Every animation starts with an idea. Don't feel pressured to create a complex character right away. A simple stick figure or even a geometric shape with a bit of personality works perfectly. Our goal is to nail the motion, not to create an illustrative masterpiece.
First, decide on a simple action. A wave, a jump, or a nod are all excellent choices. Sketch it out.
Next, you'll define the key poses. These are the most important frames that anchor the entire movement and tell its story. For a character waving, you'd have three main poses:
- Start: The arm is resting at the character's side.
- Peak: The hand is at the highest point of the wave.
- End: The arm is back down in its original resting position.
Place these three drawings on separate frames in your timeline. Think of them as the pillars of your animation; everything else will be built around them.
My pro tip? Get up and act it out yourself. No, seriously. Stand in front of a mirror and wave or jump. Feel how your weight shifts, where the momentum builds, and how your body follows through. That physical feedback is pure gold for making your animation feel believable.
Refining Motion and Adding Personality
With your key poses locked in, it's time to add the "in-betweens"—the frames that bridge the gaps and create smooth motion. While your software can generate these for you, your real job as an animator is to tweak the timing and spacing to give the movement personality.
Is it a quick, energetic wave? Or a slow, lazy one? You control this feeling by adjusting the spacing of your frames.
- Frames placed closer together create slower, more deliberate motion.
- Frames spaced farther apart create fast, snappy action.
This hands-on, project-based way of learning is incredibly effective. Just look at the success of one popular After Effects course that has helped over 26,000 students. The creator even made it free on YouTube, encouraging a massive community to share their work. You can see this project-based approach in action and get a dose of inspiration.
To keep you on track, here's a simple checklist to guide you through building your first scene from start to finish.
Your First Animation Project Checklist
Use this checklist to break the process down into manageable phases as you create your first scene.
| Phase | Key Task | Goal |
|---|---|---|
| 1. Concept & Sketching | Draw a simple character and plan a basic action (e.g., a wave). | Establish a clear visual idea and motion goal. |
| 2. Setting Key Poses | Create the main start, middle, and end frames for the action. | Define the core story of the movement in the timeline. |
| 3. In-betweening | Add or generate the frames that connect your key poses. | Create the illusion of smooth, continuous motion. |
| 4. Timing & Spacing | Adjust the position of the in-between frames. | Control the speed and rhythm to add personality. |
| 5. Final Polish | Review the animation, add a simple background, and export. | Complete the scene and have a shareable final product. |
Following these steps methodically will help you turn your initial sketch into a polished piece of animation you can be proud of. Happy animating
Getting Your Animation Out Into the World
https://www.youtube.com/embed/6UXjRCORV44
You’ve done the hard work and brought your animation to life. That’s a huge win! But now comes the final hurdle: getting your creation out of your software and ready to share with everyone. It can feel a bit technical, but I promise it's straightforward once you understand the basics.
This last step is called rendering. All it means is that the software is taking all your individual layers, keyframes, effects, and drawings and squishing them together into a single, playable video file. Think of it as developing a photo from a film negative—it turns all the raw pieces into the final product.
Choosing the Right Wrapper for Your Animation
Once your animation is ready to go, you need to pick the right file format. This is like choosing the right box to ship something in. Different destinations—like YouTube, Instagram, or a professional portfolio—have different preferences.
Here are the most common formats you'll run into:
- MP4 (H.264 Codec): This is the king of the internet. It provides a fantastic balance of high quality and small file size, which is exactly what you want for online platforms. It’s your best bet for almost everything.
- GIF: Perfect for those super short, endlessly looping animations you see all over social media and in chats. While they work everywhere, GIFs have a limited color palette and can get surprisingly big. Save them for quick, punchy moments.
- MOV (ProRes Codec): This is the professional’s choice. If you’re sending your file to another video editor or collaborating on a project, a MOV file using a ProRes codec keeps the quality pristine. The trade-off? The files are absolutely massive.
For anyone starting out, just stick with MP4. It’s the format you’ll use 99% of the time. It’s what the web is built for.
The Balancing Act: Quality vs. File Size
As you export, you'll face choices about resolution, frame rate, and compression. These settings are a constant balancing act between how good your video looks and how big the file is. Getting a feel for this is a crucial skill.
A classic beginner mistake is cranking every setting to the max. This usually just creates a gigantic file that’s a pain to upload, with no real visual benefit for the person watching it on their phone or laptop. The goal is to find the sweet spot.
A solid starting point for anything you’re putting online is 1920×1080 resolution (1080p). Make sure to export at the same frame rate you animated with, typically 24 or 30 FPS. This keeps things looking sharp without creating a monster file. For a quick Instagram story, you could even drop it to 720p and no one would notice.
Where to Show Off Your Work (and Get Better)
Now for the really fun part—sharing what you’ve made! Putting your work out there isn’t just about getting likes; it’s one of the best ways to learn and grow.
Here are a few great places to start:
- Behance: An amazing platform for building a professional portfolio. It’s where you can post your polished, finished pieces.
- Instagram: Its visual nature makes it ideal for short, eye-catching animation loops. Get discovered by using hashtags like #animation, #motiondesign, and #2danimation.
- Reddit: Communities like r/animation and r/BeginnerAnimation are incredibly welcoming. You’ll find people who are genuinely happy to give you constructive feedback.
Don't be afraid to ask for specific critiques. Instead of a vague "What do you think?", try asking something like, "Does the timing of this character's jump feel natural?" You'll get much more helpful advice, and every piece of feedback will push you forward on your animation journey.
So, Where Do You Go From Here?
First off, congratulations on creating your first animation! Getting something to move for the first time is a genuinely magical feeling. But once that initial excitement fades, you're often left wondering, "What's next?" The secret is to keep that momentum going without getting overwhelmed.
It's tempting to jump straight into a big, ambitious project, but trust me, that's a quick recipe for burnout. The real progress comes from drilling down on the core principles that give your animations life and personality. We're moving beyond just making things move and into making them move believably.
The two concepts that will give you the most bang for your buck right now are squash and stretch and anticipation.
Squash and stretch is all about giving your objects a sense of weight, mass, and flexibility. Picture a rubber ball hitting the ground—it squashes flat on impact and stretches out as it bounces back up. This one idea alone can turn a stiff, robotic animation into something that feels organic and alive.
Putting New Principles Into Practice
You don't need to start a massive short film to get good at this stuff. In fact, short, focused exercises are way more effective for building muscle memory. Think of these like a musician practicing scales—they're the foundation for everything else.
Here are a few classic drills I recommend to really nail these concepts:
- Animate a Pendulum: A simple pendulum swing is the perfect exercise for getting a feel for natural arcs and timing.
- Drop a Flour Sack: This is a legendary animation exercise for a reason. Making a flour sack fall and hit the ground forces you to master squash and stretch to show its weight and impact.
- Animate a Simple Jump: Before a character jumps, they almost always crouch down first. That little crouch is anticipation. It telegraphs the action to the audience and builds up the energy for the main movement, making the final jump feel much more powerful.
Find Your People and Your Tools
Learning animation doesn't have to be a solo mission. Honestly, one of the best things I ever did was connect with other animators online. Seeing how other people tackle problems and getting feedback on your own work is priceless.
It's also about setting goals you can actually hit. Instead of saying, "I'm going to make a 2-minute film," challenge yourself to create a 3-second looping GIF that perfectly executes the principle of anticipation. These small, achievable wins are what build real skill and confidence.
To keep you moving forward, we’ve put together a curated list of tutorials, tools, and communities that I personally find valuable. You can check out our full list of vibe coding animation resources to find your next bit of inspiration or a tutorial to tackle.
Keep practicing, stay curious, and remember to celebrate every little step you take.
Answering Your First Questions as a New Animator
Getting started in animation is thrilling, but it's natural to have a few questions swirling around. I've been there, and trust me, every single animator has asked these same things. Let's clear up some of the common early-stage hurdles so you can focus on the fun part: making things move.
What’s the Best Frame Rate to Start With?
This is a big one, and it directly affects how your animation looks and feels. Frame rate, measured in frames per second (FPS), is just how many individual images flash on the screen in a single second.
For beginners, I almost always recommend starting at 12 FPS. It gives your work a really charming, stylized feel that's reminiscent of classic cartoons. The best part? It's forgiving and means you only have to produce 12 drawings for one second of animation, which is way less intimidating.
Once you get more comfortable, you can move up to the industry standard of 24 FPS. This is what you see in big-budget animated films, and it creates that super-smooth, fluid motion. But don't rush it. Nail the basics at 12 FPS first.
How Long Should My First Animation Project Be?
I know the temptation. You have a grand idea for a two-minute short film. My advice? Don't do it. Not yet, anyway. That's a surefire path to getting overwhelmed and giving up.
Your goal right now is to finish something. Anything.
Aim for a simple, looping animation that's just 3 to 5 seconds long. Think about animating a single, focused action: a character waving, a ball bouncing, or a flower blooming. A short, polished loop is infinitely more valuable for your portfolio and your confidence than a long, abandoned project.
Finishing a small project proves you can follow through on an idea from concept to completion. That feeling is a huge motivator and a critical milestone for any new animator.
But Do I Need to Be a Great Drawer?
This is the biggest misconception that holds people back. Let's be clear: incredible drawing skills are a bonus, but they are absolutely not required to be an animator.
Animation is fundamentally about the art of movement, not the art of illustration.
You can create fantastic, compelling animations with nothing more than simple shapes, stick figures, or abstract patterns. The real magic happens when you apply animation principles—like timing, spacing, and weight—to bring those simple forms to life. Some of the most successful motion designers have built entire careers just by animating text and basic shapes.
Don't let the fear of drawing stop you. Consider styles where illustration isn't the main focus:
- Motion Graphics: Bringing logos, icons, and shapes to life.
- Cut-Out Animation: Creating digital puppets from separate pieces and moving them around.
- Kinetic Typography: Animating words to express meaning and emotion.
Your ability to tell a story through motion will always be more important than your ability to draw a perfect portrait.